No edit summary |
(fixed error) |
||
| (15 intermediate revisions by 7 users not shown) | |||
| Line 7: | Line 7: | ||
|act = 3 |
|act = 3 |
||
|location = |
|location = |
||
| − | |start = [[Delilah Howe]] <br> ([[ |
+ | |start = [[Delilah Howe]] <br> ([[Hightown]]) |
| − | |end = [[Nathaniel Howe]] <br> ([[ |
+ | |end = [[Nathaniel Howe]] <br> ([[Deep Roads]]) |
|previous = |
|previous = |
||
|next = |
|next = |
||
| Line 14: | Line 14: | ||
}}</onlyinclude> |
}}</onlyinclude> |
||
| − | '''Finding Nathaniel''' is an Act 3 [[Secondary quests|secondary quest]] in ''[[Dragon Age II]]''. Hawke goes to [[ |
+ | '''Finding Nathaniel''' is an Act 3 [[Secondary quests|secondary quest]] in ''[[Dragon Age II]]''. Hawke goes to the [[Deep Roads]] in search of [[Nathaniel Howe]] at the request of his [[Delilah Howe|sister]], who fears for his life. |
| − | This quest is available if the pre-built "The Martyr" or "No Compromise" background was chosen, or if a ''[[Dragon Age: Origins - Awakening]]'' import is used in which Nathaniel survives. This quest is mutually exclusive with [[Fool's Gold]]. You will get one or the other depending on the background chosen/imported |
+ | This quest is available if the pre-built "The Martyr" or "No Compromise" background was chosen, or if a ''[[Dragon Age: Origins - Awakening]]'' import is used in which Nathaniel survives. This quest is mutually exclusive with [[Fool's Gold]]. You will get one or the other depending on the background chosen/imported. You cannot get both quests within a single playthrough. |
| − | {{Bug|DA2|{{ |
+ | {{Bug|DA2|{{Platforms|PC|PS3|Xbox360}}There is a problem where this quest doesn't trigger. A possible reason for this is that if you imported an ''Awakening'' saved game without Nathaniel in your party at the end, then he is considered dead even if he survived the assault on Vigil's Keep. There is a way to work around this bug on the PC (see [[#Bugs]] for details).}} |
== Acquisition == |
== Acquisition == |
||
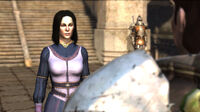
[[File:Delilah howe act3.jpg|thumb|200px|Delilah Howe in Hightown]] |
[[File:Delilah howe act3.jpg|thumb|200px|Delilah Howe in Hightown]] |
||
| − | In Act 3 |
+ | In Act 3 you find [[Delilah Howe]] near the Chanter's Board in front of the Chantry in [[Hightown]]. She will plead with [[Hawke]] to find her brother [[Nathaniel Howe]], who has been retracing the steps of [[Bartrand]]'s [[The Deep Roads Expedition|expedition]] into the [[Deep Roads]] with his fellow [[Grey Wardens]]. Nathaniel did not tell her why the Wardens were retracing the route and he has been gone too long. She would have contacted [[Vigil's Keep]] for aid but feared Nathaniel would be dead by the time she reached [[Amaranthine]]. |
| + | |||
| + | If [[Anders]] is in the party he will remember Nathaniel and jokingly say "I wonder if Nathaniel ever found a sense of humor." Anders will discuss some of his history with Nathaniel if Hawke inquires. Agreeing to help Delilah results in {{Approval2|Anders|+5}}; refusing gets {{Approval2|Anders|-5}} but the quest is accepted anyway. |
||
== Walkthrough == |
== Walkthrough == |
||
| + | Go to The Deep Roads using the Free Marches map location which is unlocked when the quest is accepted. |
||
| − | Go to The Deep Roads using the map, which is unlocked when acquiring the quest. The third room has a chest containing [[Vestments of Sacrifice]]. You will find Nathaniel fighting [[darkspawn]] in the clearing just outside. After saving him, Nathaniel will accompany you as you search for his friends. Fight another group of darkspawn below the stairs, and continue to find [[Temmerin Glavonak]]. In the next battle, immediately use the nearby lever to kill the [[Ogre]] with explosives. |
||
| + | |||
| + | Hawke's party enters into a small empty room which leads to another empty room. The third room has a chest containing [[Vestments of Sacrifice]]. You will find Nathaniel battling a group of [[Hurlock]]s and [[Hurlock Bolter]]s in the cavern just outside. If Anders is present Nathaniel will remember him with fondness. Hawke will have the opportunity to question Nathaniel about his purpose in the expedition. Nathaniel was separated from his fellow Wardens during an attack and fears for them. He reveals that the Wardens were investigating because Hawke's expedition went farther into the Deep Roads than anyone believed possible. The [[First Warden]] ordered the investigation and offered Nathaniel a generous share of the salvage plus extra coin up front to discourage curiosity. If the [[Architect]] was spared by the [[Warden-Commander]] in ''Awakening'' Nathaniel will discuss it with Hawke, and mention that the Wardens have mysterious new allies. These allies assured the Wardens the tunnels were clear. The Wardens had also believed the Deep Roads to be safer following the struggle after the [[Amaranthine conflict (9:31 Dragon)|Amaranthine conflict]]. He will also reveal that the Wardens learned of the location from Bartrand. It was deemed too risky to contact Hawke or [[Varric Tethras|Varric]] about the expedition for fear that Hawke and his party might return if questioned about it. |
||
| + | |||
| + | After saving him, Nathaniel will accompany Hawke deeper into the tunnels to search for his friends. In the cavern past Nathaniel's location are a group of Hurlock Bolters. A Pile of Bones and Rubble can be looted here. Continue into the chamber to find [[Temmerin Glavonak]]. Temmerin explains that he set up explosives in the chamber in order to destroy as many darkspawn as possible. Initially the explosives were used by the Wardens to excavate the thaig. He mentions that the explosives were developed by [[Dworkin]], who has since been forced into hiding by the [[Qunari]]. Temmerin points out that the explosives he set can be triggered by levers. Nathaniel tells him to flee. |
||
| + | |||
| + | An [[Ogre]] will approach from deeper in the chamber, along with Hurlock Bolters and Hurlocks. Draw the Ogre and other darkspawn into the narrow passage close to the explosives so that the Ogre cannot charge and pull the lever to eliminate them. The Ogre will reward Hawke with a randomized amount of {{s}} and {{c}}. |
||
As you continue down into the lower level: |
As you continue down into the lower level: |
||
| − | * If [[Bethany]] or [[Carver]] was recruited into the Grey Wardens at the end of Act 1, you will encounter them here as the only other Grey Warden to survive. After a brief conversation with your sibling, he/she joins you in the final ensuing battle. |
+ | * If [[Bethany Hawke|Bethany]] or [[Carver Hawke|Carver]] was recruited into the Grey Wardens at the end of Act 1, you will encounter them here as the only other Grey Warden to survive. After a brief conversation with your sibling, he/she joins you in the final ensuing battle. |
* If your sibling did not join the Grey Wardens in Act 1, then Nathaniel laments that none of his other companions survived, and the final battle immediately begins. |
* If your sibling did not join the Grey Wardens in Act 1, then Nathaniel laments that none of his other companions survived, and the final battle immediately begins. |
||
| − | During the final battle, waves of darkspawn will attack from the west, east, and north. Three levers control explosives in each of their respective directions. |
+ | During the final battle, waves of darkspawn will attack from the west, east, and north: Hurlock Bolters and Hurlocks as well as three Ogres. The Ogres appear one at a time, from all directions, with one hiding in the smaller room off the main chamber and the others approaching from the opposite ends of the chamber. Three levers control explosives in each of their respective directions. For the best effect, use the explosives only when an Ogre is near a barrel in that direction. '''''Note''''': the explosives cause friendly fire. |
| − | After the battle |
+ | After the battle Nathaniel will give you [[The Bringer of Silence]]. He (and your Grey Warden sibling, if present) will bid you and your party farewell. A Dwarven Battle Helmet can be looted from an Ogre, [[Wardwall]] and [[Drakeskin Leg Straps]] from a chest to the north, and [[Aurvar's Prize]] can be found in a [[Chest]] right before the exit. Exit the Deep Roads to the west. |
== Result == |
== Result == |
||
| Line 44: | Line 52: | ||
* 400 XP (quest completion) |
* 400 XP (quest completion) |
||
* Random loot from the various fights. |
* Random loot from the various fights. |
||
| + | * Random loot from the various [[container]]s. |
||
* {{:The Bringer of Silence|style=iconmini}} (given by [[Nathaniel Howe]], after the last fight){{clrl}} |
* {{:The Bringer of Silence|style=iconmini}} (given by [[Nathaniel Howe]], after the last fight){{clrl}} |
||
* {{:Wardwall|style=iconmini}} (unlocked chest to the north){{clrl}} |
* {{:Wardwall|style=iconmini}} (unlocked chest to the north){{clrl}} |
||
| Line 54: | Line 63: | ||
== Bugs == |
== Bugs == |
||
| − | * If a saved game is imported from a play-through in which Awakening was completed, the decision about whether or not the Architect was spared might not be |
+ | * If a saved game is imported from a play-through in which ''Awakening'' was completed, the decision about whether or not the Architect was spared might not be flagged properly by the quest. Nathaniel may state that the Architect was spared even if the player killed him. |
| − | : Workaround: You may use the developer [[Console (Dragon Age II)|console]] provided with Dragon Age II using {{Console|runscript zz_dae_debug}} to accept the quest if it didn't appear. The steps to take in the work around are: plot jump -> secondary plots -> one-offs -> work with plot -> Finding Nathaniel -> set plot flag -> quest accepted, then go to the Deep Roads. Note that the cutscene with [[Delilah Howe]] will be skipped. |
+ | : Workaround: You may use the developer [[Console (Dragon Age II)|console]] provided with ''Dragon Age II'' using {{Console|runscript zz_dae_debug}} to accept the quest if it didn't appear. The steps to take in the work around are: plot jump -> secondary plots -> one-offs -> work with plot -> Finding Nathaniel -> set plot flag -> quest accepted, then go to the Deep Roads. Note that the cutscene with [[Delilah Howe]] will be skipped. |
| − | * After killing the first darkspawn group, it's possible Nathaniel's dialogue won't trigger in the next room, which leaves the quest unable to be completed. It's possible this is bugged because Carver is kidnapped during [[Best Served Cold]], thus preventing him from appearing in the Deep Roads. After completing Best Served Cold and then doing |
+ | * After killing the first darkspawn group, it's possible Nathaniel's dialogue won't trigger in the next room, which leaves the quest unable to be completed. It's possible this is bugged because Carver is kidnapped during [[Best Served Cold]], thus preventing him from appearing in the Deep Roads. After completing Best Served Cold and then doing Finding Nathaniel, Carver appeared. |
| − | * Carver may call you "Brother |
+ | * Carver may call you "Brother," regardless of your gender. |
| − | * {{platforms|ps3}} When you meet Carver in the Deep Roads, he is wearing his Warden armor. If you reload the game from the auto-save that occurs shortly after meeting him, he will be wearing his Lothering |
+ | * {{platforms|ps3}} When you meet Carver in the Deep Roads, he is wearing his Warden armor. If you reload the game from the auto-save that occurs shortly after meeting him, he will be wearing his Lothering clothing instead. |
| − | * If you save Merin in [[Fool's Gold]] |
+ | * If you save [[Merin]] in [[Fool's Gold]] he will appear with Temmerin, having become a Grey Warden. His dialogue might cut the conversation short with Temmerin, preventing you from using the explosives in the coming battle. '''''Note''''': this interaction is [[cut content]] and not accessible by normal means as the two quests are mutually exclusive. |
| + | * {{platforms|ps3}} The explosive levers appear when toggled over but can be difficult, even impossible, to trigger. It may take several button presses to activate the levers, if they can be activated at all. |
||
| ⚫ | |||
| ⚫ | |||
| − | <gallery widths=" |
+ | <gallery widths="189" captionalign="center"> |
| − | + | finding nathaniel 1.jpg|Meeting Nathaniel |
|
| − | finding_nathaniel_4.jpg|Temmerin Glovonak |
||
| + | finding nathaniel 4.jpg|Temmerin Glavonak |
||
| ⚫ | |||
| − | + | finding nathaniel 6.jpg|Bethany Hawke will be present if she joined the Wardens |
|
| ⚫ | |||
</gallery> |
</gallery> |
||
[[Category:Dragon Age II secondary quests]] |
[[Category:Dragon Age II secondary quests]] |
||
Revision as of 13:48, 16 April 2014
Finding Nathaniel is an Act 3 secondary quest in Dragon Age II. Hawke goes to the Deep Roads in search of Nathaniel Howe at the request of his sister, who fears for his life.
This quest is available if the pre-built "The Martyr" or "No Compromise" background was chosen, or if a Dragon Age: Origins - Awakening import is used in which Nathaniel survives. This quest is mutually exclusive with Fool's Gold. You will get one or the other depending on the background chosen/imported. You cannot get both quests within a single playthrough.
Acquisition

Delilah Howe in Hightown
In Act 3 you find Delilah Howe near the Chanter's Board in front of the Chantry in Hightown. She will plead with Hawke to find her brother Nathaniel Howe, who has been retracing the steps of Bartrand's expedition into the Deep Roads with his fellow Grey Wardens. Nathaniel did not tell her why the Wardens were retracing the route and he has been gone too long. She would have contacted Vigil's Keep for aid but feared Nathaniel would be dead by the time she reached Amaranthine.
If Anders is in the party he will remember Nathaniel and jokingly say "I wonder if Nathaniel ever found a sense of humor." Anders will discuss some of his history with Nathaniel if Hawke inquires. Agreeing to help Delilah results in ![]() Anders: friendship (+5); refusing gets
Anders: friendship (+5); refusing gets ![]() Anders: rivalry (+5) but the quest is accepted anyway.
Anders: rivalry (+5) but the quest is accepted anyway.
Walkthrough
Go to The Deep Roads using the Free Marches map location which is unlocked when the quest is accepted.
Hawke's party enters into a small empty room which leads to another empty room. The third room has a chest containing Vestments of Sacrifice. You will find Nathaniel battling a group of Hurlocks and Hurlock Bolters in the cavern just outside. If Anders is present Nathaniel will remember him with fondness. Hawke will have the opportunity to question Nathaniel about his purpose in the expedition. Nathaniel was separated from his fellow Wardens during an attack and fears for them. He reveals that the Wardens were investigating because Hawke's expedition went farther into the Deep Roads than anyone believed possible. The First Warden ordered the investigation and offered Nathaniel a generous share of the salvage plus extra coin up front to discourage curiosity. If the Architect was spared by the Warden-Commander in Awakening Nathaniel will discuss it with Hawke, and mention that the Wardens have mysterious new allies. These allies assured the Wardens the tunnels were clear. The Wardens had also believed the Deep Roads to be safer following the struggle after the Amaranthine conflict. He will also reveal that the Wardens learned of the location from Bartrand. It was deemed too risky to contact Hawke or Varric about the expedition for fear that Hawke and his party might return if questioned about it.
After saving him, Nathaniel will accompany Hawke deeper into the tunnels to search for his friends. In the cavern past Nathaniel's location are a group of Hurlock Bolters. A Pile of Bones and Rubble can be looted here. Continue into the chamber to find Temmerin Glavonak. Temmerin explains that he set up explosives in the chamber in order to destroy as many darkspawn as possible. Initially the explosives were used by the Wardens to excavate the thaig. He mentions that the explosives were developed by Dworkin, who has since been forced into hiding by the Qunari. Temmerin points out that the explosives he set can be triggered by levers. Nathaniel tells him to flee.
An Ogre will approach from deeper in the chamber, along with Hurlock Bolters and Hurlocks. Draw the Ogre and other darkspawn into the narrow passage close to the explosives so that the Ogre cannot charge and pull the lever to eliminate them. The Ogre will reward Hawke with a randomized amount of ![]() and
and ![]() .
.
As you continue down into the lower level:
- If Bethany or Carver was recruited into the Grey Wardens at the end of Act 1, you will encounter them here as the only other Grey Warden to survive. After a brief conversation with your sibling, he/she joins you in the final ensuing battle.
- If your sibling did not join the Grey Wardens in Act 1, then Nathaniel laments that none of his other companions survived, and the final battle immediately begins.
During the final battle, waves of darkspawn will attack from the west, east, and north: Hurlock Bolters and Hurlocks as well as three Ogres. The Ogres appear one at a time, from all directions, with one hiding in the smaller room off the main chamber and the others approaching from the opposite ends of the chamber. Three levers control explosives in each of their respective directions. For the best effect, use the explosives only when an Ogre is near a barrel in that direction. Note: the explosives cause friendly fire.
After the battle Nathaniel will give you The Bringer of Silence. He (and your Grey Warden sibling, if present) will bid you and your party farewell. A Dwarven Battle Helmet can be looted from an Ogre, Wardwall and Drakeskin Leg Straps from a chest to the north, and Aurvar's Prize can be found in a Chest right before the exit. Exit the Deep Roads to the west.
Result
Nathaniel will assist in the fight against Meredith during The Last Straw. Note that there are specific conditions for his appearance; see the quest's walkthrough for details.
Rewards
- 770 XP (for the fight)
- 400 XP (quest completion)
- Random loot from the various fights.
- Random loot from the various containers.
 The Bringer of Silence (given by Nathaniel Howe, after the last fight)
- Wardwall (unlocked chest to the north)
- Drakeskin Leg Straps (same chest)
- Aurvar's Prize (unlocked chest to the west, before the exit)
Notes
- Sebastian: friendship (+10) by agreeing to help Nathaniel find the other Wardens. (Sebastian's comment: "Crawling through blight-infested tunnels, rescuing Wardens in peril. This is what I signed on for.")
- Aveline: rivalry (+5), Isabela: rivalry (+5) by agreeing to help Nathaniel find the other Wardens. (Aveline's comment: "Protecting fools from themselves.")
Bugs
- If a saved game is imported from a play-through in which Awakening was completed, the decision about whether or not the Architect was spared might not be flagged properly by the quest. Nathaniel may state that the Architect was spared even if the player killed him.
- Workaround: You may use the developer console provided with Dragon Age II using runscript zz_dae_debug to accept the quest if it didn't appear. The steps to take in the work around are: plot jump -> secondary plots -> one-offs -> work with plot -> Finding Nathaniel -> set plot flag -> quest accepted, then go to the Deep Roads. Note that the cutscene with Delilah Howe will be skipped.
- After killing the first darkspawn group, it's possible Nathaniel's dialogue won't trigger in the next room, which leaves the quest unable to be completed. It's possible this is bugged because Carver is kidnapped during Best Served Cold, thus preventing him from appearing in the Deep Roads. After completing Best Served Cold and then doing Finding Nathaniel, Carver appeared.
- Carver may call you "Brother," regardless of your gender.
- When you meet Carver in the Deep Roads, he is wearing his Warden armor. If you reload the game from the auto-save that occurs shortly after meeting him, he will be wearing his Lothering clothing instead.
- If you save Merin in Fool's Gold he will appear with Temmerin, having become a Grey Warden. His dialogue might cut the conversation short with Temmerin, preventing you from using the explosives in the coming battle. Note: this interaction is cut content and not accessible by normal means as the two quests are mutually exclusive.
- The explosive levers appear when toggled over but can be difficult, even impossible, to trigger. It may take several button presses to activate the levers, if they can be activated at all.
Gallery
")
")
")
")