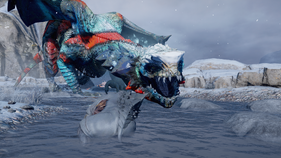
The Kaltenzahn is one of the twelve high dragons encountered in Dragon Age: Inquisition. It can be found in the eastern area of Emprise du Lion in Judicael's Ring. The Inquisitor can gain access to the region by completing the war table scouting operation Restore Judicael's Crossing.
Background[]
The Kaltenzahn originated in the Hunterhorn Mountains, but in 9:30 Dragon, an entire flight of them migrated south and settled in lonely and isolated places. Some believe that the darkspawn are responsible for driving them off, while others believe that only an Archdemon could have caused such a flight, as the Kaltenzahn are legendarily stubborn. The Kaltenzahn's piercing scream, freezing breath and thick scales make it a challenging foe even for the most experienced of dragon hunters.[1]
Quests[]
Locations[]
Stats[]
- Level 21 Boss
- 245457 HP (Normal) / 267202 HP (Nightmare difficulty)
- 65 Armor
- Greater Cold Resistance
- Fire Vulnerability
- Immunity: All Disabling Effects
- Immunity: Slowed
- Perceptive
Strategy[]
The Kaltenzahn breathes ice, dealing cold damage. Accordingly, she’s resistant to cold damage but vulnerable to fire damage. She is immune to almost all status effects; the one notable exception is poison, which will damage her.
Kaltenzahn’s attacks and abilities[]
All dragon attacks deal high amounts of damage and may inflict status effects with certain attacks. The Kaltenzahn uses the following attacks and abilities:
- Flight: at set points in the fight, she will fly off, circling the area and pelting the party with ice balls and her ice breath. When she lands, she will knock any nearby party members off their feet and deal damage. See the battle section for more info.
- Melee attacks:
- Claw: she will look at a target in melee range and raise the closest leg to signify a claw attack. This is done quite slowly and can easily be avoided with Combat Roll (warriors), Evade (rogues) or Fade Step (mages).
- Bite: she will bite a target in melee range, but only if they are at her front and attacking her head. Identifying this attack can be difficult as it uses a similar animation to other attacks.
- Tail: she will raise her tail up and to the side, then swipe the whole area behind her. A tail swipe is harder to avoid than an attack with her legs since it will cover a larger area.
- Jump: although not strictly an attack, she will occasionally jump about the battlefield, knocking over any party members in range at both her start and end points.
- All melee attacks will knock over party members in range. Being knocked over deals damage and leaves the party vulnerable in the time it takes to get back to their feet.
- Elemental attacks:
- Ice ball: she may shoot a ball of ice at a party member. The ball will deal damage on hit and leave a cloud of frost behind afterwards. Any party member entering the cloud will be chilled (slowed). This ball can be avoided fairly easily because it travels in a completely straight line – just run to the side. The cloud can be removed with Dispel.
- Ice breath: she may breathe ice at nearby party members. She will broadcast this attack by raising her head back and up. Unlike the ice ball, she will turn to direct this attack at party members.
- Vortex: she may raise her wings high up above her body and flap her wings four times. This generates a vortex that sucks party members outside of melee range close to her, dealing damage with every flap. It does not deal damage to party members inside the vortex. The vortex also deflects ranged projectiles coming from outside its area of effect, including ability attacks like Energy Barrage or Long Shot, but doesn't deflect attacks from inside. Get all party members into melee range as quickly as you can. Once the vortex is over, move your ranged attackers away as soon as possible.
- Guard: she may generate a full guard bar at random intervals. This is usually signified by her jumping away, lowering her head, stamping her feet on the ground, and glowing. The guard bar must be destroyed in order to keep damaging her.
- Matriarch: she will shriek, stunning the entire party regardless of range, and summoning 2-5 dragonlings to attack the party. Do not ignore the dragonlings, as they will kill your entire party far faster than the dragon itself.
- The dragonlings use melee attacks and ranged mini-ice balls. They can be frozen, inflicted with fear, or put to sleep to give you some time to deal with them. They’re resistant to ice and vulnerable to fire.
- The dragonlings may take a very long time to reach the top area, due to buggy pathfinding, and sometimes will stay downstairs for the whole battle. If this happens, ignore them – going to find them will reset the battle and return the dragon to full health.
Preparation[]
Ideally, your party should have the following set-up:
Two mages, each with the following abilities:
One warrior, with the following abilities:
- Combat Roll
- Upgraded Shield Bash; if you have Trespasser, make sure the upgrade Ring the Bell is toggled on for its extra guard damage.
- An alternative to Shield Bash is the Battlemaster ability War Horn upgraded to have Break Their Spirit, but given the investment needed to get it you’re better off with Shield Bash.
Any ranged attacker as your fourth party member, either an archer rogue or another mage.
It goes without saying that you will need to have decent equipment to stand a chance against any dragon, particularly on higher difficulties. However, there are some types of equipment that will give you a better chance against this particular dragon:
- Fire staves for mages, with dragon-slaying or spirit runes equipped if you can manage
- Dragon-slaying or fire runes for non-mage weapons will help but aren't mandatory
- Weapons that do additional guard damage, e.g. Mhemet's War Hammer (ideally, replace the electricity rune with a fire/dragon-slaying rune) or Pyre of the Forgotten
- Any armour with increased cold resistance
- Any armour with increased magic defence (magic defence increases all elemental resistances)
- Any accessories that gives a health bonus
- Any accessories that increases cold resistance
- Any accessories that gives a guard damage bonus
If possible, you should have the Inquisition perks "More healing potions" (Forces) and "Tempered glass flasks" (Inquisition) to expand the number of potions your party members can carry. The following potions, tonics and grenades are strongly recommended:
- Regeneration Potion – upgrade this potion as high as possible, as soon as possible. Adding proximity heal will mean that the regeneration potion heals the user and any nearby party members - this stacks. Adding lifeward means it heals more and faster when you're at low health. Equip it on as many people as you can.
- Cold Resistance Tonic – particularly useful for your warrior, as they will take the brunt of the breath attack.
If you have any spare potion slots and/or you don't have access to one or more of the above potions, these may work as alternates:
- Mighty Offense Tonic - will temporarily increase damage. This may be particularly useful for this fight if it's been upgraded to include bonus damage against guard.
- Rock Armor Tonic - will temporarily increase armour.
- Healing Mist - this grenade will heal any party members in its area of effect. If it's been fully upgraded, it will also revive fallen party members.
- Tears of the Dead - rogues only. This adds poison to the rogue's attack, which fully upgraded knocks down the dragon's health by a margin, nice to hit for five shots and forget..
The battle[]
Turn off the barrier spell in tactics for one of your mages and keep control of that mage as much as possible during the battle. This will allow you to refresh your party’s barrier just as it fades, while the other mage’s barrier spell is cooling down, while it also prevents the AI from casting both barrier spells at once. This means you can keep up a barrier for most of the battle, if not all of it. Only switch away from your chosen mage when you need to take control of another party member to use Combat Roll, Fade Step or Evade to dodge an attack.
The Kaltenzahn will stay on the ground for most of the fight. However, during the battle, at 75%, 50%, and 25% health, she will take off and circle the arena at least twice. During her flight she will launch ice balls and party members and/or use her ice breath to coat a line across the arena.
There is no point trying to attack while she is in the air. She will be too far away and moving too fast for attacks to connect. Even long-range mage abilities won’t work. So, while she is in the air, you should keep moving. Running in a circle around the edge of the arena is a good way to keep yourself and your party out of the way of any attacks, because they will be aimed at where you were, not where you are.
While she is on the ground, you should focus on her head, not her legs. Focusing on her head will occasionally interrupt her attacks while she shakes her head and stops attacking for a couple of seconds, buying you precious time.
Focusing on her legs is normally a good tactic for high dragons as it will eventually make them collapse on the ground for a short time, unable to move, and thus a great target for ground-based multi-hit abilities such as Mark of the Rift or Firestorm. However, this is not a good strategy for this battle, because of the unique way the Kaltenzahn finishes the battle.
Dealing enough damage to all of the legs takes a very long time, and almost always means you’ve chipped away ~80% or more of the dragon’s health. However, when the Kaltenzahn is at roughly 25% health, she will take off but she won’t land back in the arena this time. Instead, she will land on top of the ruined arches to the west and shriek, stunning the party and summoning dragonlings. She will then remain on her perch for a while, launching ice balls at the party. She will eventually return to the arena but you won’t have enough time to make her collapse.
When she lands on the ruined arches, get the party as close to her perch as possible so that she can’t target you. Keep everyone close to the arches while you deal with the dragonlings. After that, you can return to using ranged attacks on the Kaltenzahn. If you’ve followed this guide and only used one warrior, you should be able to deal enough damage to kill her while she’s still on her perch. This won’t bug the game – her skull will simply show up at the base of the arches, ready to be looted. Otherwise, you can finish her off when she returns to the arena.
Rewards[]
Killing the dragon yields:
- 15,498 XP plus 1,324 XP
- Influence 3600
- Power 5
Notable loot[]
 Caliban
 Superior Potions Belt
 Pearl (3)
 Masterwork Prowler Armor
 Pure Dragon Blood (6-10)
 Dragon's Tooth (2-4)
 Dragon Webbing (15-20)
 Dragon Scales (15-20)
 Dragon Bone (15-20)
Notes[]
- As of Patch 5, the
 Amulet of Power intended for Varric can no longer be looted from Kaltenzahn.
Bugs[]
- If Kaltenzahn or any of the summoned dragonlings are killed near the top of the stairs, the loot will become buried under the stairs rendering the loot inaccessible.
- It is possible that Kaltenzahn may fly into the mountain nearby and get stuck.
- Occasionally, Kaltenzahn's health will remain at 0 after being slain, causing the dragon to remain in a motionless state while bleeding-out. If this occurs, the entire party will stay engaged in active combat, preventing them from looting it; leaving the area and returning may allow for the dragon to fall as intended.
Gallery[]
References[]
- ↑
 Dragon Age: The World of Thedas, vol. 2, p. 304


